
Build Process

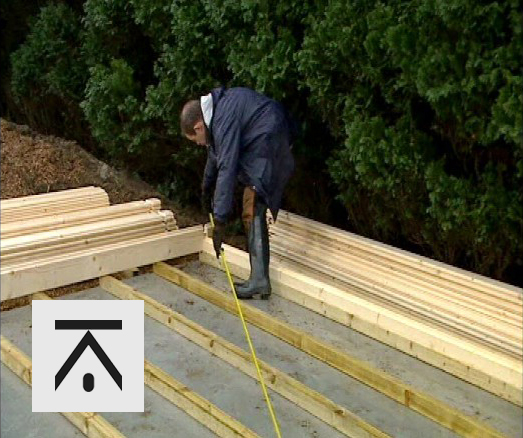
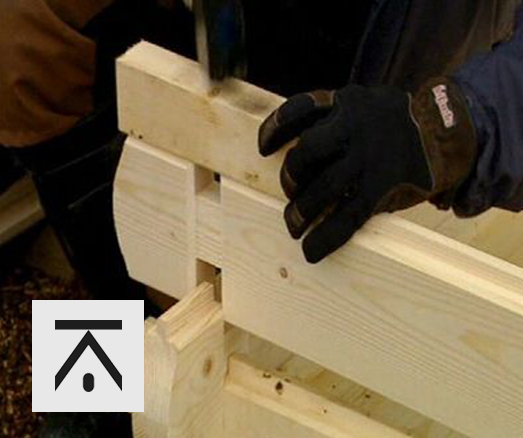
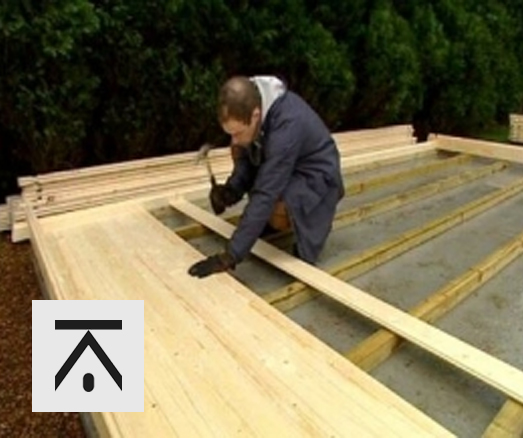
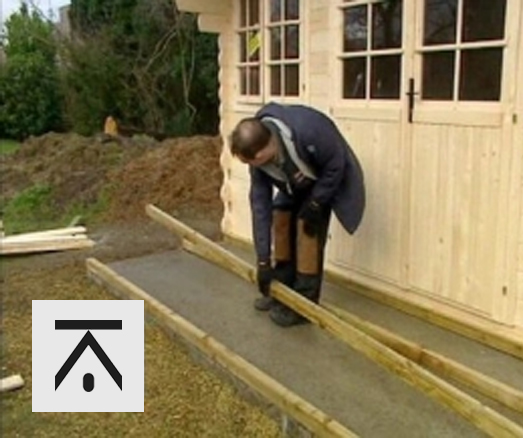
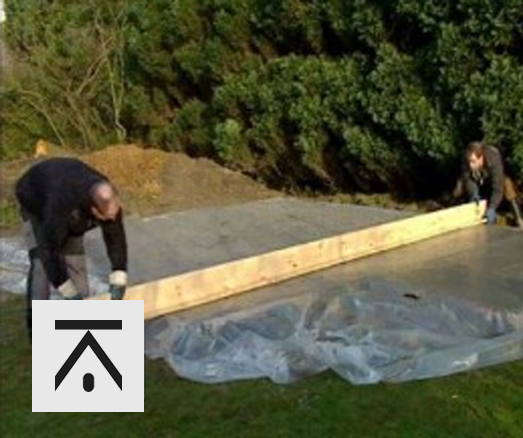
Laying out the pressure treated bearers
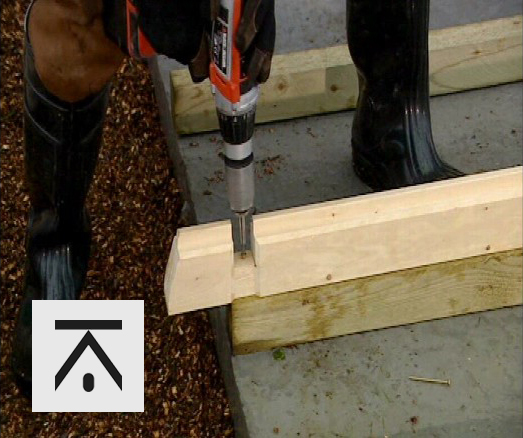
Bearers are equally spaced
Screw the half logs to the bearer
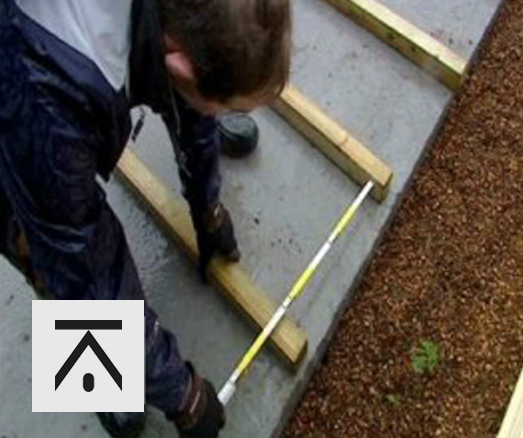
Measure the diagonals to check everything is square
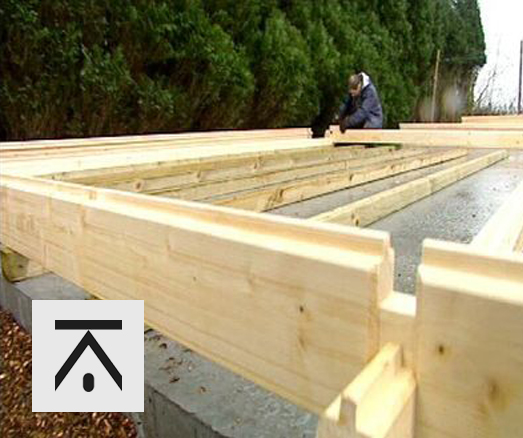
The cabin sits on a network of pressure treated floor bearers on the concrete base. These support the walls and the floor of the cabin.
On the parts list you will find the quantity and length of the high pressure impregnated floor bearers usually 58 x 58mm section, and laid in one direction. If you have chosen floor insulation system there will be extra bearers to be placed under the side walls also, so please refer to your seperate floor insulation instructions.
Place one bearer at the front of the log cabin, and one bearer at the back of the log cabin. To ensure that the bearers are in exactly the right position, take the first half wall logs and two side wall logs and build the first layer of logs. Once in the correct position check that everything is square by measuring the diagonals using a tape measure or string, and level. Screw the half logs to the bearer in the position shown. You can now place the remaining bearers equally in the remaining space.
At this point, you can choose to lay the floor boards. We prefer to do this once the cabin is built - this way they remain clean and free from footprints and scuffing which may occur during the rest of the build.
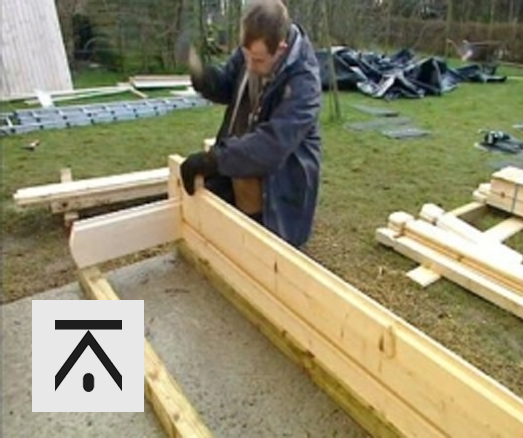
Building the log cabin walls
Lay out the first level of logs and ensure they are square
Avoid damaging the logs, use a piece of building log to hammer down on

Build the walls up layer by layer
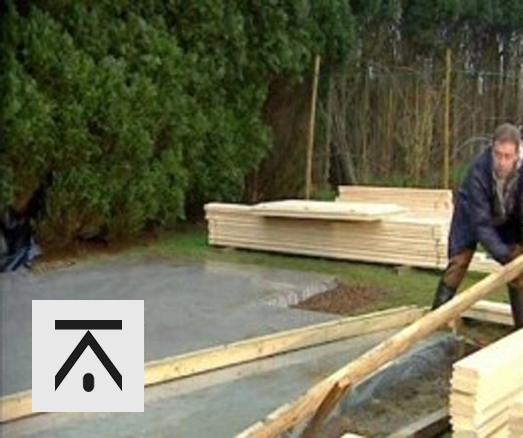
Take your parts list and ensure that you have stacked all the wall logs as near to their correct position around the base of the cabin. You will find the number and size of the wall logs on your parts list and the necessary drawings to help you locate the correct position of each wall log.
Important! – If your cabin has a veranda, please read “Building the veranda and decking” section first as you will need to cut a number of logs in the main cabin.
Start building the wall logs in accordance with the drawing on your parts list. Start with one layer of wall logs at the front side; continue with one layer at the back wall and then the logs to make up the side walls. Note – the half layer wall logs should be secured to the pressure treated bearer using screws.
The wall logs are always placed with the tongue towards the top and the groove towards the bottom.
Use a heavy rubber mallet or lump hammer to make sure that the tongue and groove of the wall logs fit perfectly. To avoid damaging the logs during installation, place the special knocking block log provided onto the tongue of the wall log and hammer down onto this instead of directly onto the wall log.
Repeat this order until all necessary wall beams are installed in accordance with the drawings on your parts list. You may prefer to add in the door and window frames as you build the log cabin walls up.
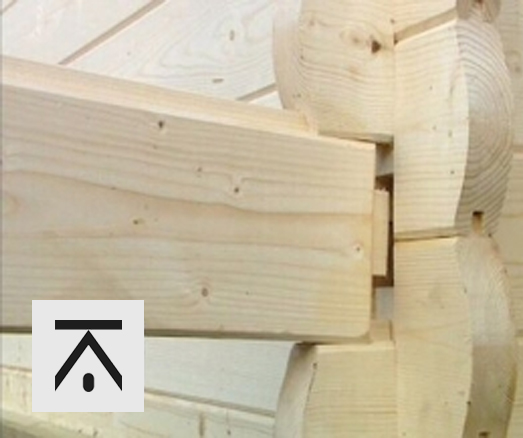
There is no requirement to glue or screw the logs to each other, all the joints are assembled dry.
It is important to lower the logs into their joints evenly a little at a time at each end, so it is always best to have someone to help at the other end.
If you have chosen a larger size cabin, it is possible that there will be a join where two log lengths meet. Ensure that you seal these logs with silicon in the join as you build.
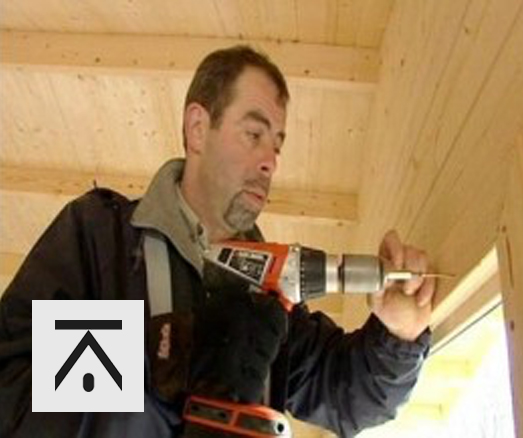
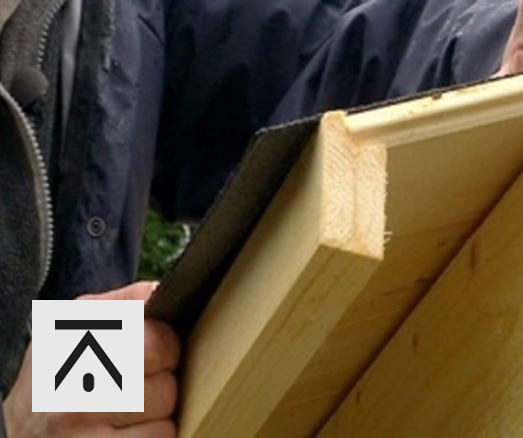
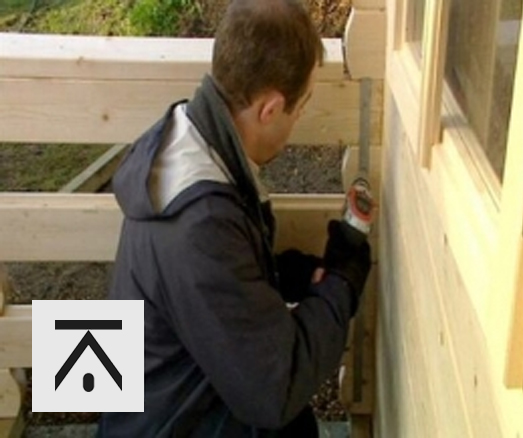
Changing the window frames to fit the wall thickness
Rick explains in this short video how to change the window frames to fit the log thickness of the cabin walls.
The doors and windows supplied will have a special U channel type frame. This channel receives the thickness of the wall logs around the door or window. The channel creates a floating frame in the wall which is important to allow wall logs to swell and contract in height around the window or door naturally and unimpeded and without distorting the door or window.
There is to be no direct fixing of the door or window directly to the walls. It will be noticeable that there will be a particularly large clearance between the underside of the wall log that spans over the door or window and the top of the window frame at the root of the U channel. This clearance is critical to allow the walls either side of the door or window to contract in height which causes the log spanning the window or door to drop down deeper into the U channel.
Expect to see a clearance of about 20 mm but more or less is common at assembly time, it all depends on the dryness of the wood at the time. Please do not be alarmed by this, it is a technically clever way of dealing with the natural behaviour of wood which if not dealt with correctly by allowing the natural freedom of movement, would cause no end of problems as it swells and contracts in different atmospheric conditions.
The U channel is formed by a machined step around the window or door plus an architrave to act as the other leg of the U channel. The window or door will have been shipped with this architrave pinned in position (not fixed, just pinned for transport and easy to pull off by hand). The gap between the legs of the U channel needs to correspond with the log thickness of the cabin. Normally the doors and windows are shipped with a 28 mm gap and if this is correct for you, run some screws through the architrave into the frame to make the U channel rigid.
The architrave has a 5 mm step on one face so by turning it over it increases the gap by 5mm from 28 mm to 33mm. If you need the gap to be 33 mm wide, then mark the existing position of the architrave on the frame, pull off the architrave removing the pins, and turn the architrave over and refit it to the marked positions this time by screwing through it into the frame.
If you need the gap to be 45 mm or 56 mm the procedure is as for 33 mm but before re-fixing to the frame there will be packer pieces provided to fit between the frame and the architrave. The packers will either be 12 mm thick to increase the gap from 33mm to 45 mm or 23 mm thick to increase the gap from 33 mm to 56 mm. It can be easier to pin the packers to the frame, aligned with your marked position, and then place the architrave on top and run the screws through the architrave and packers into the frame.
You have the choice, either prepare the doors and windows as described and build them into the walls as you stack the wall logs OR build the walls which automatically creates the apertures for the doors and windows and later on insert the doors and windows from the outside and fix the architrave and packers from the inside to stop the frames falling out.
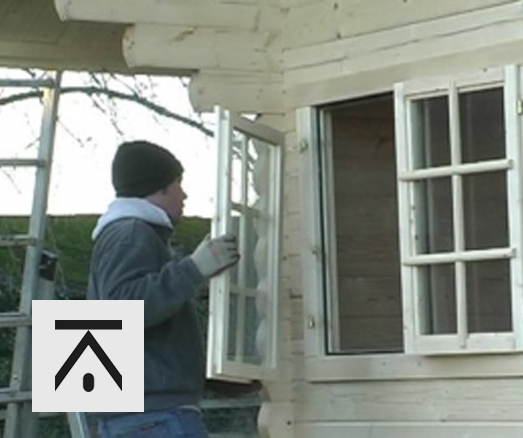
How to fit the doors and windows
Remove the tongue of the log below the door
Fixing the architrave from the inside
Windows shown with optional decorative cross bars
You have the choice of fitting the doors and windows in two ways; either prepare the doors and windows as described in “Changing your window frames to fit the log thickness of your cabin” and build them into the walls as you stack the wall logs OR build the walls which automatically creates the apertures for the doors and windows and later on insert the doors and windows from the outside and fix the architrave and packers from the inside to stop the frames falling out.
Prior to fitting doors into the wall it is necessary to remove the tongue of the log below the door so that the metal threshold bar can sit on a flat surface and be fixed down by screwing. It is not necessary to remove the tongue from the log under windows.
Standard doors and windows are designed to open outwards; this ensures that they are watertight.
Standard windows and doors come with decorative cross bars pinned on. These are optional, so it is entirely up to you whether you leave them on or not. You may need to take them off for decorating and will need to take them off to fit double glazing.
To refit, position the vertical crossbar in the centre of the window and pin top and bottom, then fit each horizontal bar across making sure you space them equally and pin at the ends. If refitting after installing double glazing, the vertical bar only will need a small cut out to increase the step length and provide clearance for the glass beading in its new more forward position.
Double glazing
If you have chosen the double glazing option, the standard doors and windows will have been supplied pre-glazed with single ply glass and 14 mm double glazed sealed units will have been provided separately.
It is a straight forward task to swap the glass and can be performed at any stage really, sometimes after decorating if you are likely to splodge all over the glass!
Simply prise off the glazing bead from the outside of the door or window, ideally using a sharp chisel or a strong thin blade (that will not snap). Take care to minimise bruising of the wood.
Lift out original glass and insert the double glazed sealed unit.
Refit the beading in its new more forward position and replace the pins if necessary.
Refit the cross bars if required as described in the doors and windows section above.
Fit door & window handles and locks.
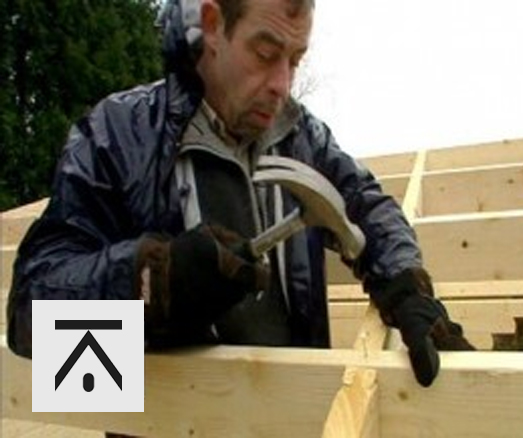
Gables and roof beams
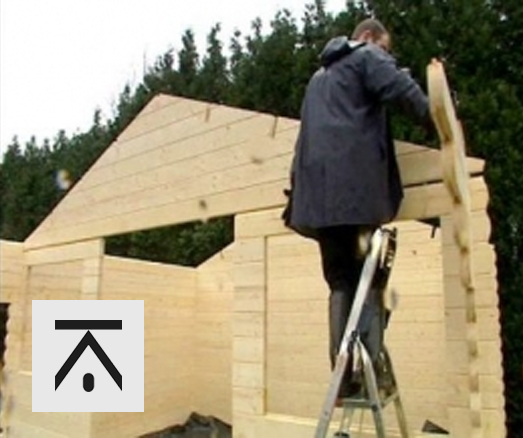
Fitting the pre assembled gable into place
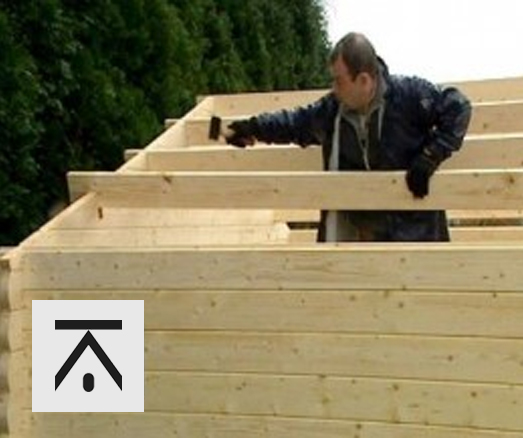
Slotting in the roof beams
Roof beams are fixed to the gable by nailing
Once you have assembled the correct number of log levels according to your plans, it will be noticed that the side walls are half a log higher than the gable walls. This is correct and is ready to receive the ‘gable’ to complete the wall log puzzle.
The gables are usually pre assembled and shaped to suit the roof style and prepared ready to receive the roof beams. These sections are heavy and will need at least two people to lift and locate into place. When the gable is inserted it is vulnerable to blowing or flopping over so ensure it is supported until you locate the roof beams into place to give more rigidity.
The roof beams are prepared with notches on their underside that locate over the gables at the root of their slots. The roof beams should be fixed to the gables by nailing. Make sure that the top of the roof beam is level with the slope of the gable before fixing in place as mistakes would be difficult to rectify.
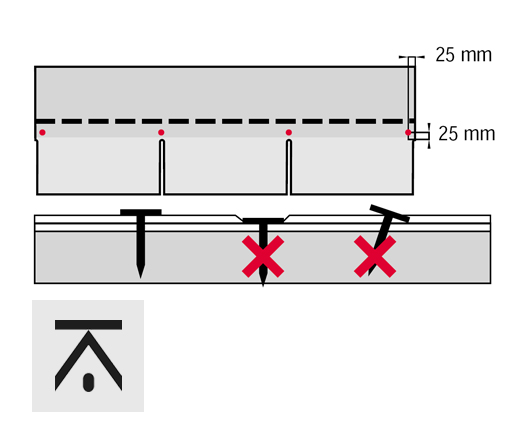
Roof boards and rain slats
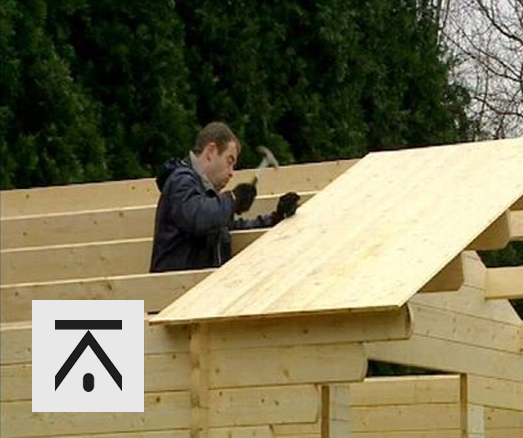
Fit the first board at the front, then repeat along the length of the roof
Nail each roof board to each roof beam and to the side wall as you go
Before you start, identify the roof boards from the floor boards. Both of these are 19mm thick but will be different lengths.
Divide the roof boards equally and place ready either side of the cabin. Fit the first board at the front of the roof, lining it up with the edge of the roof beams. The tongue should face the direction of laying and with the decorative angled side down towards the inside of the cabin.
Nail each roof board to each roof beam and to the side wall as you go. Take the next board and make sure the tongue and groove fits together perfectly and nail down. Repeat along the length of the roof, both sides.
When you reach the last board, it may be necessary to saw it to fit. Measure the distance to the end of the roof beam, then saw along the length of the roof board and fix into place.
Note – if you have a cabin with a wide gable, you may find the roof boards are supplied in two lengths. In this case you will need to fix the boards in an alternating pattern. Start with long & short, then short & long and repeat this pattern along the length of the roof.
Rain slats
Identify the rain slats on the parts list. Sometimes these are delivered in two parts. Each slat has a groove pre-cut the same thickness as the roof boards and angled to equal the angle of the roof pitch. Fit the slats so that the roof boards fit into the groove, and nail through the roof boards into the rain slat.
If you have chosen the option of roof insulation, you will not need to fit the original rain slats.
Fitting the roof insulation

Fit a pressure treated border around the edge of the roof

The insulation lies within the borders with the plywood side facing upwards
The insulation boards are easily cut to size with a saw, and are screwed through into the main roof boards
The cabin should be completed to roof level with the roof boards and rain slats fitted. Do not fit the side, front or rear fascia boards yet.
You will have received extra materials as stated in your Insulation fitting instructions.
The pressure treated timbers are to provide a border down the front edge of the roof from ridge to eaves, down the rear edge from ridge to eaves, and all along the eaves. It sits on top of the roof boards.The timbers may need to be trimmed to length.
The horizontal member at the eaves is best fitted by screwing up from the underside of the roof boards. It should be positioned 20mm up the slope from the tips of the roof boards for a standard 19 degree roof slope (or 34mm for a 30 degree roof slope).
It is recommended that a vapour control barrier is laid on the roof below the insulation layer.
The insulation material is 50mm thick rigid urethane with a 6mm plywood facing. It lies within the borders, usually in portrait orientation, with the plywood upwards. The boards need to be screwed through into the main roof boards using 70mm screws. Each board simply buts up against the next. Some pieces will need to be cut and these may be laid in any direction. It is best to cut an angle on the uppermost boards so that the plywood meets at the ridge.
It is recommended that a breathable membrane is laid over the insulation before the shingles or other roof covering is fitted. This is usually included in the pack. It is essential to use such a membrane on roof pitches below 15 degrees but is generally good practice on all roof pitches.
Side fascia boards may be cut to the appropriate length of the building. They are fixed to the side of the pre-fitted border. The purpose of setting the margin timber slightly up the roof slope is to aid the positioning of the fascia boards vertically, rather than toeing inwards.
The roof is now ready for the roof shingles or other roof covering to be fitted.
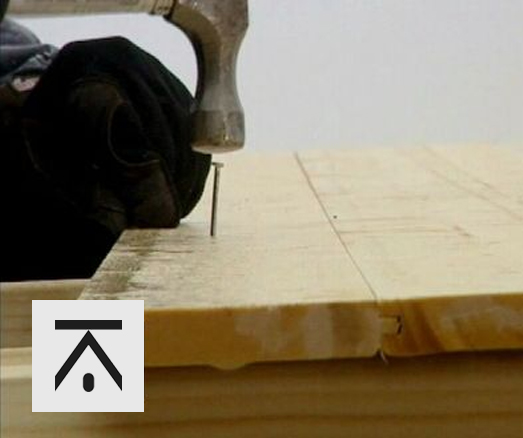
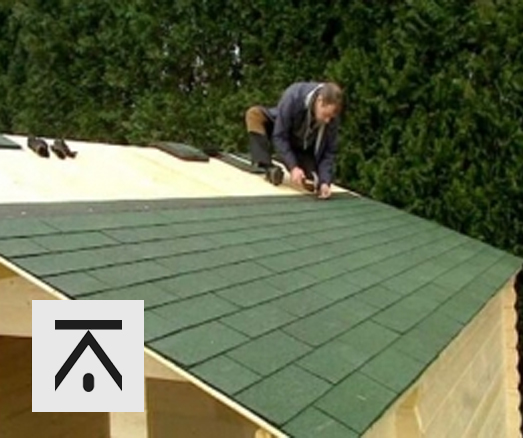
How to apply the felt roof shingles
Our felt roofing shingles are easy to fit and can be used on log cabins roofs with a slope of 12 degrees or more.
The tools you will need are a hammer and a sharp knife for trimming. The shingles are fixed to the roof boards (or insulation boards if you have chosen the roof insulation option) with clout nails. 3 shingles make up each 1 metre shingle strip.
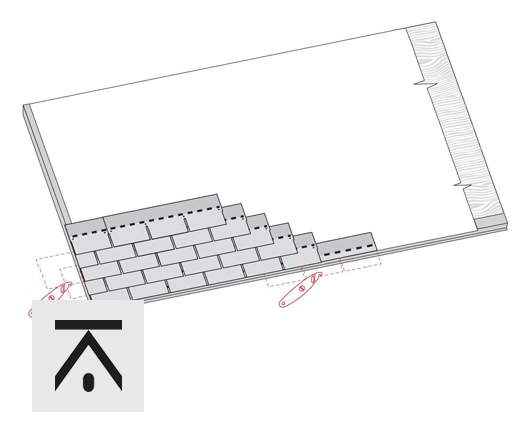
First row
Starting at the bottom edge of the roof, prepare a starter strip to go along the eaves by cutting the flaps/shingles off the strip.
This should leave you with a rectangle which should overhang the eaves edge by approximately 35mm.
Secure them all along the edge using clout nails and cut off any excess at the end with a sharp knife.
Starting at one end, take a full shingle strip and place it over the starter strip making sure you stagger the joints.
Secure with clout nails in the positions shown in the diagram. In the video you’ll notice our construction team are using a tacking gun. Both methods are fine.
Do not over hit the nails. The head of the nail should be flush with the tile.
Carry on along in a line with full shingle strips, butting up the joints. Cut away any excess at the end with a knife.
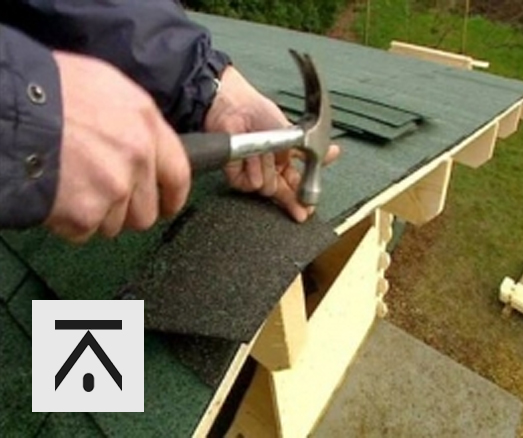
Subsequent rows
Line up a full shingle strip using the guidelines. Make sure your lines are straight and a correct tiling pattern is achieved.
Secure firmly using clout nails as you go. Again trim any excess. Carry on to the top of of the roof with the last course as near to the ridge as possible.
Ridge tiles
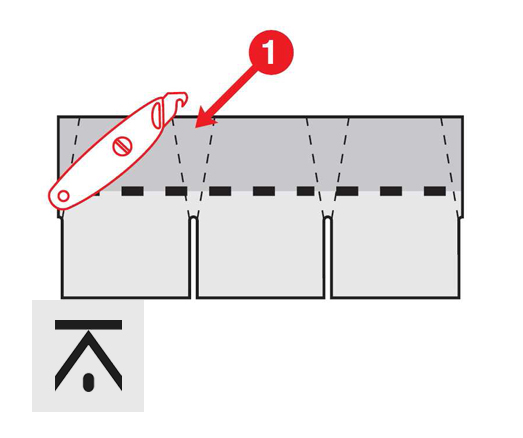
Cut each strip into 3 individual tiles as shown.
Bend the shingle over the ridge and nail down firmly.
Make sure the tiles are facing the correct way for the prevailing wind. Take the next shingle and overlap it on top of the first on. Continue along the entire ridge. Congratulate yourself on a super job!
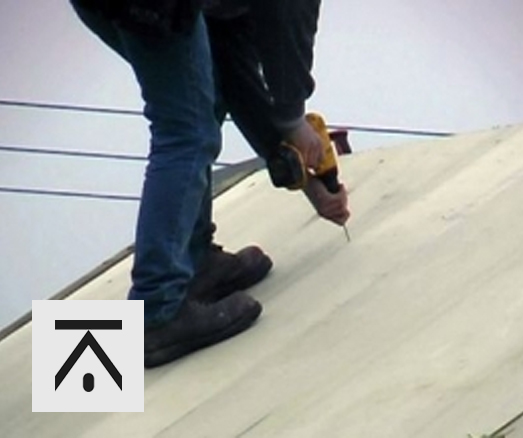
How to fit the EPDM rubber roof to your Keops Moderna log cabin
In this video we show you how to fit the EPDM rubber roof to the Keops Moderna style range of log cabins. EPDM (or to give it its full name, Ethylene Propylene Diene Terpolymer) is an excellent long life rubber membrane which is UV, ozone and infrared stable. It will not crack, peel or blister and performs very well in hot or cold environments. All of this means it is an excellent solution for flat or low sloping roofs. It is also economical when compared to felt roofs due to its long life expectancy and is environmentally friendly.
The membrane is supplied large enough to cover the entire roof. It needs to be unfolded and allowed to relax. Then fold back and apply the adhesive to either the roof boards or top ply surface of the insulation roof boards. Our video shows the insulated roof version. Using a soft broom brush over the surface to ease out any creases and air bubbles and to ensure the adhesive makes good contact. Finish off around the top fascias using aluminium trim and cut away any excess. A perfect job and a roof that will perform well for many years to come.
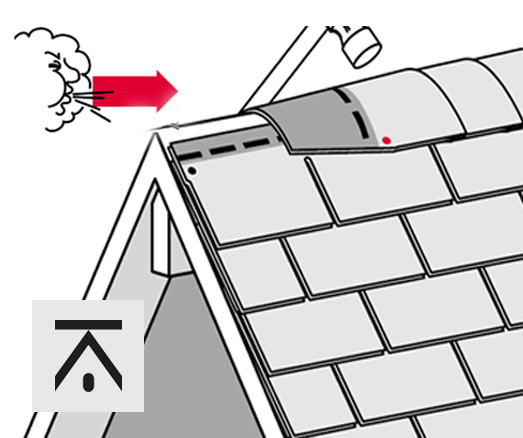
Fitting the floor insulation
For a standard un insulated floor, the floor bearers are designed to run left to right across the building and at intervals of approximately 480-500mm centre distances from front to back. These bearers are supplied as stated in the cabin parts list. This method has open sides.
For the insulated floor there are some additional materials supplied, extra floor bearers and insulation boards.
It is necessary to create an enclosed void for the insulation material. The additional materials supplied will provide the floor bearers that run along the length of the building under the side walls. For them to fit, it is necessary to reduce the length of the original intermediate bearers by 116mm. Thus original bearer – 116mm ÷ 2 x side bearers = width of cabin. The additional material will need to be cut to the appropriate length of the building.
The insulation is 50mm thick foil faced rigid urethane boards. This needs to be cut into convenient strips to fit between all the floor bearers. The board may be laid in any direction and pieces may be butted together.
Generally it is good practice, although not essential, to lay the insulation on a plastic membrane (not supplied) and to sit the boards on thin packers to provide a small air gap beneath the insulation boards (if space allows within the height of the bearer).
Laying the floorboards
Lay the floor boards across the pressure treated floor bearers
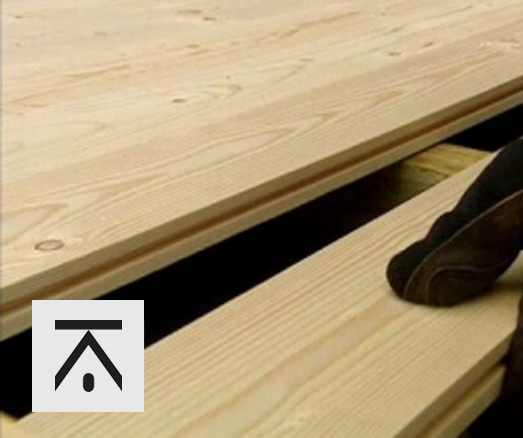
Ensure the tongue & groove fits together perfectly
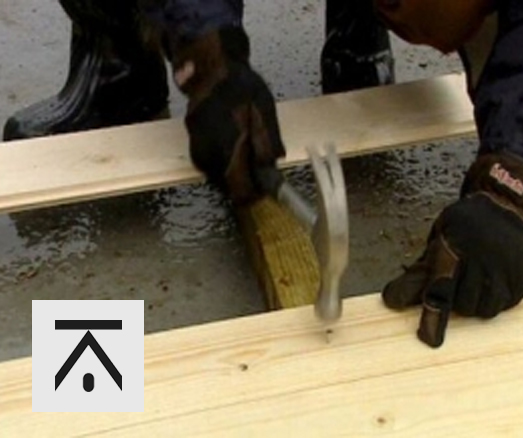
Nail each board to the bearer underneath
Identify the 19mm pine floorboards by their length. Start with the first floor board parallel to the wall of the cabin. Ensure that the tongue of the board is facing away from the wall. Allow a small gap to allow for the natural movement of the wood.
The chamfered corners should face downwards to provide a flatter top surface. Fix the first board with nails in each of the pressure treated bearers. Now take the remaining floor boards and fix them one after the other, making sure that the tongue and grooves fit together perfectly. You may need to saw the boards in places to fit around any strengthening walls. If the last board is too wide to fit, measure the remaining space and saw the board to fit correctly, it is best to not fix the last few boards until the last one has been sized and fitted in place flat down.
If the floor is long, the floor boards will be in two or more lengths. It is best to stagger the joint, so on the first line lay a short board then a long board and on the next line lay a long board then a short board. Continue the alternating sequence as you cover across the floor.
On the parts list find the floor finishing slats. These fit neatly around the walls, on the floor to hide any gaps between the floor boards and the walls.
Once the floor has been laid it is a good tip to cover it to keep it clean while you continue the construction.
Building a log cabin veranda
A veranda makes a lovely addition to any log cabin – a great place for sitting out or alfresco dining. A typical veranda is usually made up of the veranda balustrade and pressure treated timber decking floor. Here we explain how to fit one.
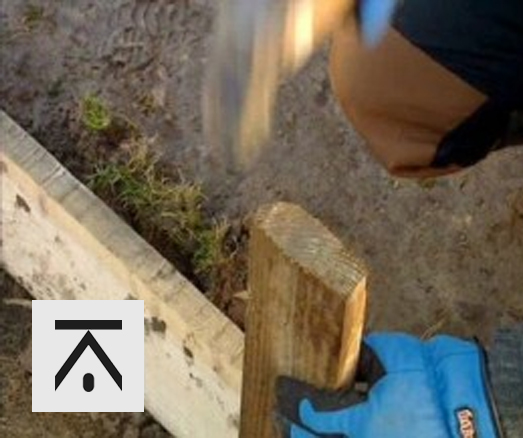
During the assembly of the cabin itself, you should already have sawn the ends off the second, fourth and sixth end wall logs to the front of the cabin. The cut should be made in the centre of the corner joint of the identified wall logs.
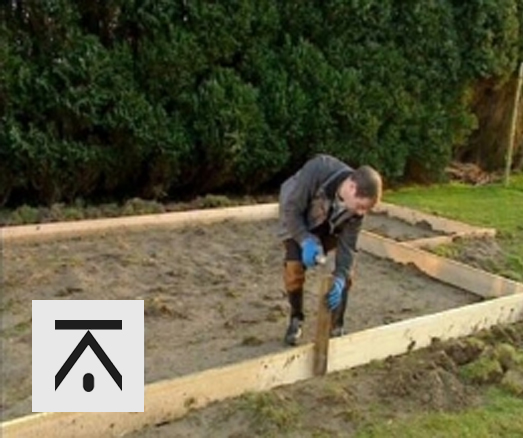
Place one of the pressure treated bearers and place it against the front of the log cabin. Place a second at a distance equal to the depth of the terrace floor, measured from the outside of the front of the cabin. Space the remainder of the log bearers equally between these two placed bearers. The number of bearers will vary due to the size of the veranda.
Before fitting the decking boards, ensure that everything is square by measuring the diagonals.
Laying out the veranda bearers
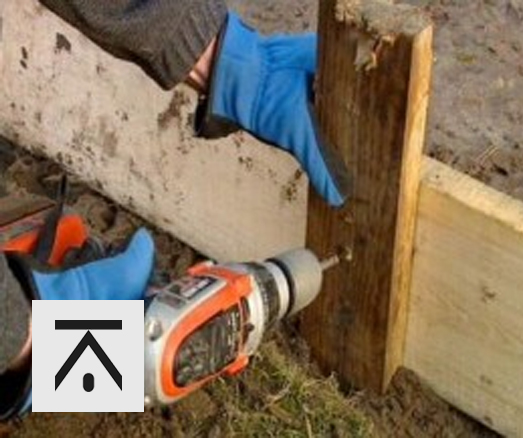
Building up the balustrade walls
Showing the sawn off log ends
Consult your parts list to identify the number and lengths of the parts you will require. The drawing will show you the correct position of each log. Build up the wall logs as shown on your drawing. Screw the first half logs to the bearer to secure. You will notice that the side logs of the balustrade fit the location of the previously sawn cabin sidewall beams. Fit the two metal slats to the inside of the balustrade near to the cabin using screws.
Next, fit the decking boards. Nail the boards to every bearer, leaving a gap of 10mm between each board. You will notice that there are two lengths of decking boards supplied, fit the longer ones at the opening of the balustrade.
On the inside of the balustrade next to the front opening, you will need to fit the two support beams. Place these 95mm from the edge of the opening, one each side. Fix with screws into the wall beams. Next, the L shaped metal brackets are fixed next to the support beams, one on each side of the opening, and screwed into the balustrade and the decking floor.
And finally, fit the balustrade cover boards to the top of the balustrade using the screws provided.
Fitting the metal support slats
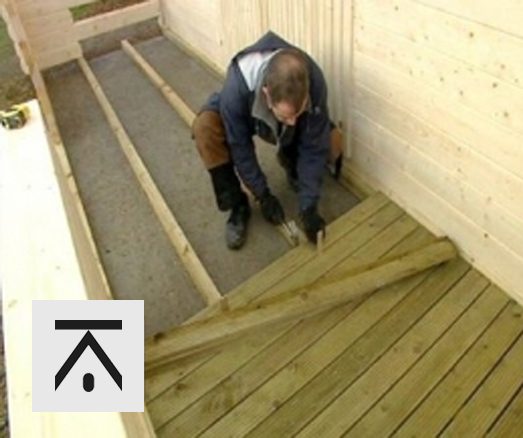
Laying the decking floor

Finishing off the balustrade
Tools & equipment you’ll need to build your log cabin

Tools you’ll need to build your log cabin
Here we have a handy list of tools and equipment you’ll need to build your log cabin. You probably own the essential ones.
Screwdriver, spirit level, hammer, mallet, saw, set square, drill, stanley knife, chisel, sealant gun, tape measure (or a ball of string for checking its all square). You will also need a step ladder or ladders for when you get to roof height.
We recommend before starting your project that you are reasonably competent at DIY as there will be instances where you will need to saw, cut and trim. You will also need the help of at least one other person with gables and purlins when building the roof of the cabin.
How to build a concrete base for your log cabin
In most cases a 100mm thick concrete slab is an ideal base for your log cabin providing the ground is reasonably level and firm. The slab described here is the “above ground” method and includes a damp proof membrane to stop damp rising up through it and to prevent the newly laid concrete drying too quickly by draining rather than by evaporation.
Firstly, establish if your ground is level enough over the area where you wish to position your cabin and that the ground is firm. If in doubt, excavate the soft ground and replace with well compacted hardcore, usually about 150 mm thick. If the site is significantly sloping, undulating or a particularly damp area, we can recommend other base solutions.
The base area should be 100mm bigger all round than your log cabin (measured to the outside faces of the cabin walls). Use 100 x 25mm timber to form the frame or shuttering for your base. Measure and mark out the correct size on the ground. Place the timber on the ground in position and knock into the ground some posts along the outside edge of the timber. These will hold the timber on its edge and stop the sides bowing out when the concrete is poured. Ensure the top of the framework is absolutely level then screw or nail the timber to the posts. If any of the posts stick up above the timber frame, cut them off with a saw. This will enable you to tamp down the concrete to make it level.
Building the framework for a concrete base
Knock the shuttering support posts into the ground
Nail or screw the shuttering boards to the posts
Make sure your frame is absolutely square by measuring the diagonals of the frame from corner to corner. These measurements should be exactly the same. You can now lay down a sheet of 1000 gauge polythene to form a damp proof membrane. Pour in the concrete then with the aid of another person level the concrete using a length of timber. With the timber on its straight edge, tamp down the length of the frame. These vibrations settle the concrete and it will find its own surface level. Tap gently on the sides of the boards with a hammer, moving all the way around the frame to release any air bubbles from the frame and the concrete. A tamped finish is not suitable for the cabin, so smooth the surface using the straight edge in a sawing motion whilst moving across the area. The straight edge must stay in contact with the pre-levelled shuttering at all times to ensure the surface remains level.
When the concrete is hard, remove the timber shuttering and lift out the posts. Normally, at above 10 degrees, the concrete will cure overnight to a sufficient hardness to build on the next day. It will continue to harden for the next 30 days.
Level the concrete using a length of timber
Level the concrete using a length of timber
Before you begin building the cabin
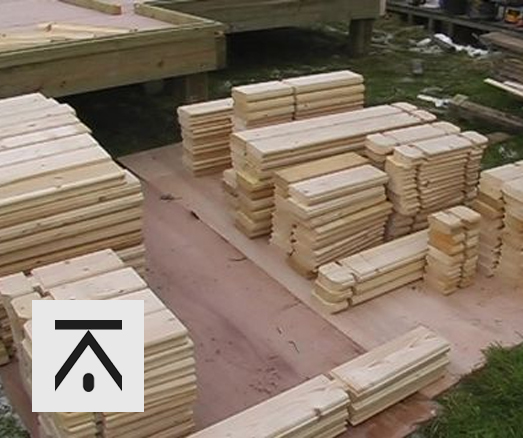
Organise the parts before you start
The parts list is very specific to your cabin and is the real clue to how it all fits together.
The generic construction manual guides you through the various stages of assembly in general terms.
Every item is listed on the parts list giving a name of the item, a quantity, a sketch to indicate its general appearance and an overall length. Each item is given a code letter (not on the actual part). On the same document will be a wall plan drawing which calls up the part code needed and pictorially the quantity of each part as you build up the wall.
Before you start the construction of your log cabin it is very important that you check that the parts delivered correspond to the parts list included. Unwrap the parts of the pack, then group and stack them in piles of similar pieces. Check that the sizes and quantity all tally with the parts list. Contact us immediately if you discover anything missing.
Don’t put the parts directly onto a wet or dirty floor as this will soil the wood and will not be easy to remove afterwards.
Ensure that you have all the necessary tools to hand.
How to apply wood treatments to your log cabin

Cuprinol pre treatment wood preservative
We highly recommend that you treat your log cabin with wood preservatives as soon as possible after it has been built. The logs will be supplied ‘natural’ and untreated so it is extremely important that you protect the wood from the elements so that it lasts for years to come.
When you are ready to apply the protective finish, you must first make sure that the log surfaces are clean and dry. Make sure that you are not working in strong sunlight or rainy weather or in extreme temperatures (whichever product you choose, take note of the manufacturers guidelines).
Read thoroughly all of the directions for the particular product that you buy before applying. Usually more than one coat will be needed. Follow the instructions carefully, if it says to wait 24 hours between two coats then do not try to out guess. Make sure you wait the required time before adding an additional coat.
Our advice is to use Cuprinol Wood Preservative Clear as a pre treatment which will protect the wood before applying subsequent treatments. Cuprinol describe this as a colourless general-purpose preserver for interior or exterior use. It gives deep penetrating protection to sound wood against decay, mould and blue-staining fungi. This low odour formula has been specially developed with low aromatic solvents to make it more pleasant and convenient to use.
We recommend that you apply liberally with a brush (it can be sprayed, but spraying can lose some of the product to the atmosphere and it may be difficult to get into all the joins and nooks and crannies). Apply evenly, working it well in to the logs and paying particular attention to the joins and the open grain of the log ends.
After the Cuprinol base coat has dried sufficiently, typically 2 – 5 days, you are ready to apply the top wood treatment. We recommend either Sadolin or Sikkens. For more advice on what and what not to use, we suggest you read our article Choosing the right wood treatment for your log cabin.
A good tip is to paint the whole way along each log at a time, starting from the bottom and working up. This way any drips won’t show and you can break off at any time without leaving a drying line. If you paint in sections from top to bottom you will get a darker ‘overlap’ which will look patchy and unsightly. Don’t worry if after the first coat the colour looks a bit uneven, generally that will improve with the second coat. Make sure you leave window and door frames open to dry well before closing. You don’t want them getting stuck!
We sometimes get asked the question, “can I treat the logs with wood preservative before I construct the cabin?”. What happens when you do this, is the wood takes on moisture from the treatment and swells. The joints will be tight and difficult to assemble. Far better that you treat the cabin afterwards.
Afterwards, continue to maintain the cabin and inspect the exterior regularly. Sadolin and Sikkens products will typically last around 5 years before you need to re treat. If you keep up with the proper maintenance of your log cabin, you will prevent any unsightly peeling that can occur in the future.
New Sadolin Superdec wood treatment colours
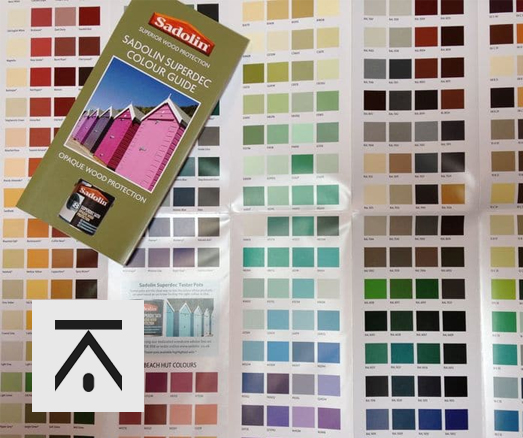
Wood treatment colours
Not only have Sadolin extended their Superdec range of colours, but they’ve also introduced new Beach Hut colours, RAL and BS4800 colours. That’s nearly 300 shades to choose from! Whether you’re after a Dark Dusty, Burnt Plum, Hot Lava, Dill Pickle or a Wild Grape, you’re sure to find the perfect colour. Sadolin Superdec gives you;
- Up to 8 years protection
- Self priming and undercoating
- Solid colour finish
- Highly flexible, allowing for natural timber movement
- Exceptional durability
- Resists peeling, blistering & flaking
- In satin finish
Superdec is a great product for your newly built cabin or summerhouse but also ideal when a complete change of colour is required, or where the existing surface has become weathered and uneven.
Sample pots in all the Superdec shades are available. You can call 0844 7780 998 for wood care advice or tester pots or go to www.sadolin.co.uk.


Ready to get your dream cabin?
Speak to us and we can supply you with a quote within 48 hours!